Support the Timberjay by making a donation.

Trail cam tips from a real expert
REGIONAL— Trail cameras are popular with hunters, wildlife photographers, nature lovers, and security buffs. They’ve also proven extremely useful for wildlife researchers as the Voyageurs …
This item is available in full to subscribers.
Attention subscribers
To continue reading, you will need to either log in to your subscriber account, or purchase a new subscription.
If you are a current print subscriber, you can set up a free website account and connect your subscription to it by clicking here.
If you are a digital subscriber with an active, online-only subscription then you already have an account here. Just reset your password if you've not yet logged in to your account on this new site.
Otherwise, click here to view your options for subscribing.
Please log in to continue |
Trail cam tips from a real expert
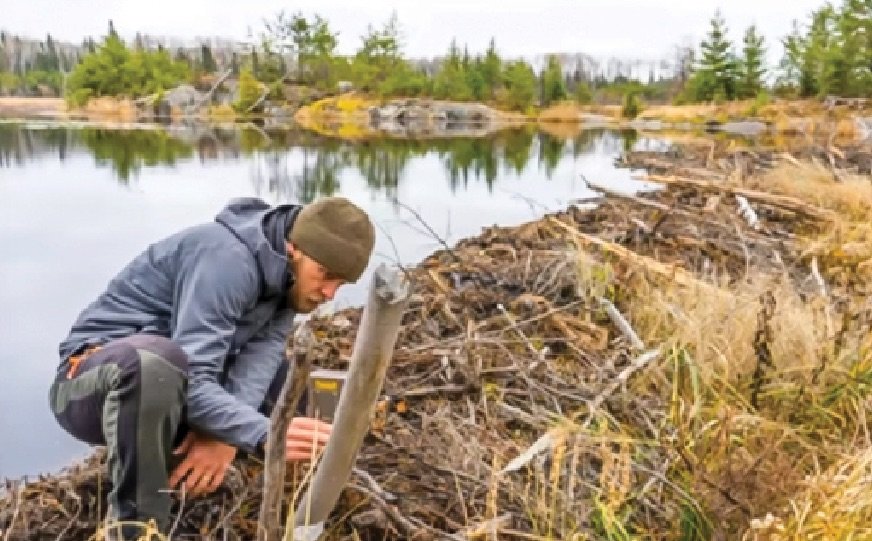
REGIONAL— Trail cameras are popular with hunters, wildlife photographers, nature lovers, and security buffs. They’ve also proven extremely useful for wildlife researchers as the Voyageurs Wolf Project, based in and around Voyageurs National Park, has demonstrated in recent years.
Tom Gable, who leads that ongoing research project recently offered an online webinar full of helpful tips on how to get more and better wildlife shots through the use of trail cameras.
Few people in Minnesota have more experience with trail cameras than Gable, whose research project maintains about 210 trail cameras at any one time, and he’s learned many useful lessons over the years mostly through trial and error.
Planning ahead is key, he said, to increasing your odds of capturing great images of wildlife with a trail camera.
Among the factors to consider, said Gable, are these:
The right equipment. While you can buy a $25 trail camera these days, keep in mind you get what you pay for. After testing dozens of different makes and models of cameras, Gable recommends a Browning Spec Ops camera, which will run you about $190 for a package that includes the camera, an SD card to record the images, a screw-in mount, as well as lithium batteries. Gable said his project has shifted over almost entirely to lithium batteries because they last a long time in any weather and are the only batteries that will continue to work well even when the temperatures fall below zero, as happens frequently in their study area.
“Rechargeables are nice, but they die in cold weather,” said Gable. Incidentally, Gable said he has no deal or sponsorship of any kind with Browning, so he has no vested interest in recommending their cameras.
For night shots, Gable recommends getting a no-glow camera, which can’t be detected in the dark. Some cameras do glow when operating in infrared mode, and that can make them easy to spot by both humans and some of the animals you might to wanting to photograph.
Gable typically uses a 64 gig SD card, which matches up well with the typical life of his batteries. In other words, by the time the card is full, the batteries usually need replacement anyway, so everything can be swapped at one time. When you’re maintaining 210 cameras, efficiency clearly matters.
Gable also recommends the use of camera mounts, which can screw into a tree. “They make it easy to set cameras right where you want them,” he said. He also recommends using cable locks to prevent your camera from being stolen, particularly if it’s being placed in an exposed location where other people might find it.
To ensure the highest resolution photos or videos, Gable sets all of his cameras to “ultra quality.” He also regularly cleans his cameras’ lenses to help ensure sharp images.
Location, location, location. You can have the best equipment on the market, but if you don’t place your camera in a good spot and aim it properly, you’re likely to be disappointed with the results. Where you locate your camera depends a lot on what kind of wildlife you’re hoping to capture. If you’re looking to capture images or video of predators like wolves, lynx, bobcat, fisher, or bear, Gable recommends using linear features on the landscape, which predators often follow. That can include trails, beaches, and especially beaver dams. He also recommends looking for pinch points which provide a natural funnel. These can include a valley between two high ridges, narrow upland slots between lakes or significant wetlands.
Gable said he often relies on aerial imagery, available on Google Earth, which helps him to find these natural features that foster movements of wildlife.
In winter, wildlife will frequently take advantage of packed trails, such as snowmobile or snowshoe trails, or plowed logging roads. Gable said his research team routinely uses snowmobiles to pack trails in their study area, then place their cameras along these routes.
Camera height and alignment are also important, according to Gable. If you’re placing your camera along a trail, consider aligning it so it’s facing down the trail as much as possible, rather than perpendicular to it. That gives you a much wider activation field for the camera along the trail and is more likely to get animal faces head on, rather than sideways shots.
Placing your camera at the proper height is also important, said Gable, since it helps to ensure that you’re getting all of your target animal in the frame. He recommends placing cameras at about the height of the shoulder of the animal you’re trying to photograph. For a wolf, that might be 30 inches, but half that for a fisher or a beaver.
If you’re hoping to capture images of deer or moose, you’ll need to place the camera much higher or you’ll end up with nothing but legs.
In addition, Gable says you need to be thinking about your background. If you have lots of shrubs, young trees or tall grass in the background, you’re likely to get countless photos of vegetation swaying in the wind, wasting your batteries and the space on your SD card.
Consider using lures. Most predators are on the move when they’re not sleeping and that means you might only get one shot of that bear or wolf that passed into the view of your camera. For a researcher, like Gable, that doesn’t provide as much useful information as can be gleaned from an animal that stops and hangs around in front of the camera. Scents, such as the types used by trappers, make that possible. Gable uses a product called Skunk Junk, which is available for $25 from www.minntrapprod.com. Gable advises that it’s extremely stinky, so it’s best to have latex gloves with you, so you don’t get it on you. It comes in a gel form, so with a little care you should be able to leave the stink back in the woods where it will definitely stop most predators in their tracks. Smear a little on a branch or tree trunk in front of your camera and it will improve your chances of capturing images of curious critters.
More webinars ahead
Gable is offering more interesting webinars in the coming months. The courses are provided through the University of Minnesota and cost $20, although the funds help cover some of the costs of the Voyageurs Wolf Project. You can still register and view Gable’s presentation on using trail cameras by going to www.tickets.umn.edu. Click on U of M Tickets and Events and look for the link to the Voyageurs Wolf Project.
Upcoming webinars include: Wolf Personalities, Ecosystem Impacts, and the Possibility of Wolf Cultures, set for Wednesday, March 15, and Ending the Cycle of Wolf-Livestock Conflict with a Fence, set for Wednesday, April 12. Both webinars are scheduled from 6:30-8:30 p.m.


